Creating the Visual Studio project for the extension.
This is part 2 of the tutorial. Click here for part 1.While it would have been nice to have a more modern cross platform build system supported out of the box (like CMake), the currently available solution still does its job. And once you understand its inner workings, you can take some shortcuts in creating projects.
For Windows, the WinCC-OA api directory provides several template projects, solutions and batches to use for creating new WinCC-OA items:
- control extensions
- drivers
- driver plugins
- EWOs (widgets)
- managers
How these batches work
A stream editor (the sed tool) which is delivered with WinCC-OA is used to copy the template files and apply some string based search and replace operations on the new file. Combined with the use of environment variables, these allow the user to quickly create an extension to use and expand upon.Creating an extension
This is something that can be more easily performed from the command line. In short, you will need to do the following:- open a command prompt window
- navigate to the folder where you want to create a solution
- E.g. pushd d:\work\pvss
- call vcvarsall.bat. First, you may need to find it.
- In my case, using a default installation path, it was in: [C:\Program Files (x86)\Microsoft Visual Studio 10.0\VC\]. You could also add the folder to the system path if you use it a lot.
- E.g: call "c:\Program Files (x86)\Microsoft Visual Studio 10.0\VC\vcvarsall.bat"
- call the API batch file that "creates" (copies) the project files
- pass the name of the solution to it (E.g: mySampleApplication).
- E.g: call "%API_ROOT%/newWCCILCtrlExt.cmd" mySampleApplication .
- note: this batch file will also set some (temporary) environment variables used by the solution (E.g VC8_DEFS, API_INCL, API_LIB, D_PVSS_VER)
- go to the solution directory (the folder name is given a prefix)
- E.g: cd CtrlmySampleApplication
- start the Visual Studio solution from the same command prompt window.
- For Visual Studio Express: start /b vcexpress mySampleApplicationCtrlExt.sln
- For Visual Studio Pro: start /b devenv mySampleApplicationCtrlExt.sln
A suffix is added to the solution name provided by you, based on the type of project. E.g, for a control extension, the "CtrlExt" suffix shall be appended to the name.
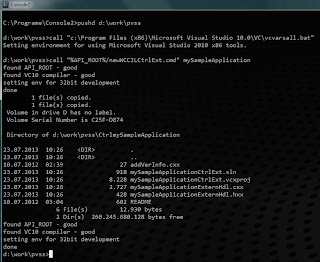
Here's an example of how calling the batch file will look like:

One of the key aspects of using this approach is that you prepare the environment variables in this command prompt window. And this is a step that you would need to repeat every time you start the solution. Each and every time. Which will get tedious after a while. Otherwise, you may have the surprise of opening the solution with a double click on the (*.sln) file will not allow you to even compile the project.
Next up: Options for starting the Visual Studio solution.

No comments:
Post a Comment